XFCE Desktop on Raspberry OS
A desktop environment for the Raspberry Pi

A desktop workstation as bold as our Raspberry Pi obviously needs a modern and slick desktop environment. This is easily installed and for this I chose the XFCE Desktop Environment for several reasons:
- its lightweight, low on system resources
- fast
- clean, well structured and just looks good
- does not “get in the way”
Of course there are many other (good) alternatives and in the end its a matter of personal taste. However, we must admit that the Raspberry Pi’s resources and computing powers are rather limited and that makes XFCE one of the more appealing desktop environments for this tiny SBC.
How to install XFCE on Raspberry OS:
In my previous blog entry we installed Raspbian OS Lite - with no additional software packages. We will put the necessary graphical desktop components on top of that. For that we need the following:
- a desktop environment -> xfce4 (of course)
- a window manager -> xfwm4
- a session manager -> xfce4-session
- a display manager -> lightdm
- a display server -> Xorg
Startup your Raspberry Pi and install the following packages:
> sudo apt install xserver-xorg xfce4 xfce4-goodies
apt then shows which packages will be installed to get a running graphical desktop, if everything looks good you confirm this by entering ‘yes’.
Note the xfce4-goodies package: While this isn’t necessary for a working desktop environment this package contains many useful tools for your graphical environment. Installation of this package is highly recommended and many of the following tips and tricks will use this package.
The installation will take a while, so this is a good oportunity for a coffee break. When everything is done, ensure that your system starts the display server at boot time by executing:
> sudo systemctl set-default graphical.target
Then we select the desired (and only one installed) display manager for our system:
> sudo dpkg-reconfigure lightdm
Next select the right session manager:
> sudo update-alternatives --config x-session-manager
It will look similar to this:
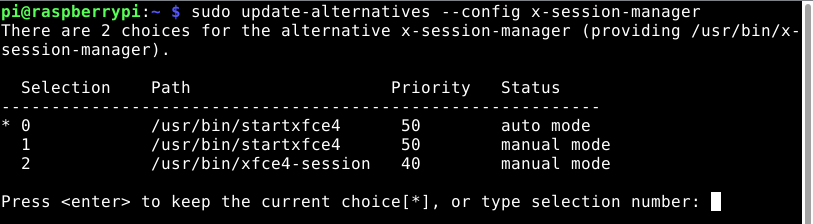
Select the line “/usr/bin/startxfce4” with the Status listed as “auto mode” - in most cases this will be the entry with the number “0”.
Finally make sure the correct x-window-manager is set:
> sudo update-alternatives --config x-window-manager
As xfwm4 is (most probably) the only installed window manager no additional configuration is needed.
Now its time to reboot your Raspi and when the login screen shows up you select Xfce Session from the drop-down menu in the upper right corner of the login screen. After that log in with your username and password.
Next we will configure the desktop itself and enable useful features like auto-login and so on. Thanks for reading!
Created with jekyll