Raspberry OS
Which OS should you install on your Raspberry Pi?
Well, there are a lot to choose from. I decided to run Raspberry Pi OS (32bit) without the standard PIXEL-desktop because I like XFCE more. The 64bit OS is still beta and therefore out. There are many other Linux distributions like Ubuntu ARM or Manjaro ARM. But right now, the Raspberry OS has the best hardware support. This might change over time of course and I will keep an eye on the other distributions, especially on the 64bit versions. What we do to get our Raspi running is:
- we will install a light version of Raspberry OS on a micro sd-card
- this “primer os” will be used to update the boot eeprom of the Raspi and enable USB booting
- then we install Raspberry OS to our SSD with the aid of another PC.
- then we will boot this OS from SSD and setup everything else
Step-by-step instructions to get your Raspberry running:
You will need the hardware from my last post and another PC or notebook with a card reader (from your neighbour, your workplace or whatever :) )
Hint: The hardware setup is described on the box of the Raspi and the box of the cooler for your Raspberry, everything should be obvious, except for the HDMI cable: Connect this to the port that is closer to the USB-C port (where the power cable is connected).
1.) Goto raspberrypi.org and download and install the Raspberry Pi Imager for Windows, macOS or Ubuntu. If you are a linux user and do not like the Raspberry Pi Imager you could download the “Raspberry Pi OS Lite” image directly from: raspberrypi.org/software
2.) Launch the imager, insert the micro-SD-card, then choose “Raspberry Pi OS Lite (32bit)” and write it to your memory card. If you don’t want to use the Imager, you copy the downloaded image to the card with the following command:
dd if=2021-03-04-raspios-buster-armhf.img of=/dev/sdX bs=4M conv=fsync
Of course, replace the name of the .img-file with the one you downloaded and replace /dev/sdX with the right path to your card reader. In case you don’t know the right file name, enter the following commands in a terminal window:
> sudo dmesg -c
then insert the memory card into the reader and execute
> sudo dmesg
It prints a line which looks similar to this:
sd 1:0:0:2: [sdd] Attached SCSI removable disk
and sdd would be the right name for your card reader (could be sda, sdb, sdc and so on). Make sure you get the name right, or you might erase another drive on your computer!
3.) Once the image is written to the card, insert it into your Raspberry and start it up. After it has booted you log in with user: pi and password: raspberry
4.) Now execute
> sudo raspi-config
5.) optional: on some displays the Raspberry chooses the wrong resolution, on mine for instance it chose a 4K resolution, but my display only supports 2560x1440, so everything was hard to read. If that is the case goto “2 Display Options”, then “1 Resolution” and select a better option (could be that your displays resolution is not available, but it will once we set up a desktop environment. Hit OK, then finish and reboot. After that start raspi-config again.
6.) Now we will adjust the fan settings, its annoying if it runs permanently: Goto “4 Performance Options”, choose “P4 Fan” to enable the fan control, let the GPIO value of 14 at its default and choose 75°C as the temperature for the fan to engage. Then reboot to get a quiet Raspi.
7.) Then select “1 System Options” -> “Wireless LAN” - here you can select your home wifi (you could also connect your Raspberry with an ethernet cable to your router of course). If you want to connect to your Raspberry remotely via SSH, you select “3 Interface Options” then “P2 SSH”.
8.) Now we have to update the system, execute the following commands in the terminal:
> sudo apt update
> sudo apt full-upgrade
(this will take a while…)
The current version of Raspberry OS will also update the boot EEPROM of your Raspberry. There is no need to install rpi-eeprom (or any other additional packages) and no further steps need to be taken. If you read something like this on other pages, then this is outdated.
9.) sudo reboot (sigh)
10.) Now that the OS is up to date, the last step is to change the boot order. Run sudo raspi-config.
Then select “6 Advanced Options” and “A7 Bootloader Version” and “E1 Latest”. After that go to “6 Advanced Options” -> “A6 Boot Order” -> “B2 USB Boot”, then shutdown the system:
> sudo shutdown -h now
We are done with the hardware setup. Time for another coffee break :)
Now connect your SSD to another PC and transfer “Raspberry OS Lite” to your drive, the same way you installed the OS to the memory card at point 2.)
Once that is done, connect the drive to a (blue) USB 3.0 port on the Raspberry, remove the memory card and power up. If it does boot up, scroll down to the new point 1.) below to finish setup, if you are unlucky and your Raspberry will not boot (screen stays black for more than 30 seconds) then your SATA to USB adapter does most probably not support UASP, and we have to work around this:
- power off
- re-insert your micro sd card, disconnect the SSD
- boot from memory card
- when the Raspi has finished booting, log in and connect the SSD to a USB 2.0 port (a black port).
- make sure to connect your SSD last (after keyboard and mouse) and do not connect any other drives
- type in
> sudo dmesg
Look for the last lines (at the end of the output) that look similar to:
usb 1-1.3: New USB device found, idVendor=152d, idProduct=2578, bcdDevice= 2.04
usb 1-1.3: New USB device strings: Mfr=1, Product=2, SerialNumber=3
usb 1-1.3: Product: USB to SATA bridge
and write down the digits after idVendor= and idProduct= (in this example: 152d and 2578).
We now have to tell the kernel that it must not use the UAS protocol for this device, when it boots up. From the terminal mount the boot partition of the SSD and start an editor:
sudo mkdir /mnt/boot
sudo mount /dev/sda1 /mnt/boot
sudo nano /mnt/boot/cmdline.txt
there is only one line in this file. Now add
usb-storage.quirks=152d:2578:u
at the beginning of this line, replacing the 4-digit-codes with the one you wrote down for your device. It will then look like this:
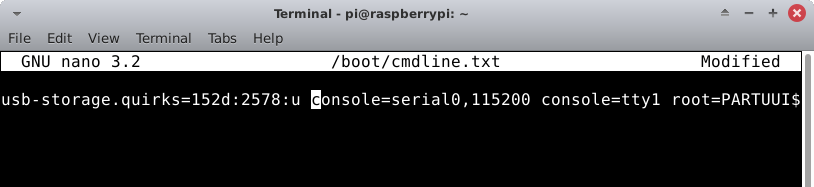
Make sure that there still is only one line in the file, then hit ctrl-X and confirm to save the file.
We now have modified the kernel bootline to instruct the kernel to use Bulk Only Transport (BOT) communication protocol for your SSD drive. Alas, this means it will not perform at full USB 3.0 speed, but at least it is able to boot from the SSD and use it as the system drive.
The performancec impact is significant though. I have tested read speeds with a controller that does not support UASP and it maxed out at 143 MB/sec. The JSAUX cable I mentioned in the first post, is fully compatible with the Raspberry Pi and reaches read speeds of 327 MB/sec. So, in the long run you should either look for a fully compatible adapter or hope that the Raspberry foundation updates the firmware for the Raspi to support all USB 3.0 adapters with UASP.
Anyways shutdown the system as described before, re-connect the SSD to a USB 3.0 port and power up the Raspberry. Let’s hope that everything is up and running in a few seconds :)
Once your Raspberry Pi finishes booting from the SSD you can set up the rest of the system:
1.) Again log in with user pi and password raspberry, change default password with the command “passwd”
2.) execute sudo raspi-config
3.) If the resolution does not fit your monitor activate the GL driver: “6 Advanced Options” -> “2 GL Driver”, select “G2 GL (Fake KMS) driver. Finish and reboot, select a desired resolution afterwards.
4.) In raspi-config go to “5 Localisation Options” and set everything as desired
5.) Select “4 Performance Options” -> “P4 Fan” activate. Let the GPIO-value at 14 and choose a temperature for the fan to engage. I chose 75°C, which results in a idle fan most of the time, and prevents the Raspberry from reaching 80° and clocking down. Reboot if you want to enable fan control now.
6.) At “1 System Options” set up your wifi network if you don’t use an ethernet cable
7.) Update the system:
> sudo apt update
> sudo apt full-upgrade
8.) Check if the boot order is still set correctly. If not set USB boot in the Advanced Options menu as done before.
That was a lot of configuration, but congratulations: You have now successfully installed Raspberry OS on your SSD! :)
In the next chapter we will install a desktop environment.
Thanks for reading!
Created with jekyll